Hello everybody, hope you are having an incredible day today. Today, we’re going to make a special dish, halloween cherry 'eye' pies. It is one of my favorites food recipes. For mine, I am going to make it a bit tasty. This will be really delicious.
When cool, draw a white line under the cherry eye and a tiny dot. In our Thursday Seasonal Kitchen this week we made our own Halloween Cherry Eye Pie 👀👻 with Katie Davies. Our home cooks cooked along with Katie and they all. When pies are cool, you can draw a white line under the cherry eye and a tiny dot using a brush and writting gel.
Halloween Cherry 'Eye' Pies is one of the most well liked of current trending foods in the world. It is simple, it’s fast, it tastes yummy. It’s appreciated by millions every day. They are fine and they look wonderful. Halloween Cherry 'Eye' Pies is something which I have loved my entire life.
To begin with this recipe, we must first prepare a few components. You can cook halloween cherry 'eye' pies using 11 ingredients and 7 steps. Here is how you cook it.
The ingredients needed to make Halloween Cherry 'Eye' Pies:
- Make ready Sweet Shortcrust Pastry
- Get 225 g plain flour
- Make ready 110 g butter, cubed & cold
- Make ready 80 g caster sugar
- Take 1 egg
- Get Or 1 packet of shopbought shortcrust pastry
- Get Sour Cherry Jam
- Get 12 cherries, pitted and frozen, (I use tinned)
- Take 1 egg, beaten
- Get Caster sugar, to sprinkle
- Get Edible white paint
Cherry Pie Filling - using canned cherry pie filling gives a spooky Halloween treat appearance and is easy! If you prefer you can use homemade cherry pie filling. Egg - the egg is beaten and brushed on the 'mummy wrappings' on top of the hand pie for a slightly shiny look after they are baked. Jack Skellington Balsamic Cherry Pie This Jack Skellington Pie is a fun and spooky way to serve up a Halloween desert.
Instructions to make Halloween Cherry 'Eye' Pies:
- Make the pastry: Blitz the flour and butter in a food processor, mix through the sugar, the egg, a dough should form if not add a little water. Bring together into a ball with you hands, but do not kneed. Flatten and wrap in cling film and chill for approx 1 hour.
- Preheat the oven to 170 fan. Once chilled, roll out the pastry to the rough thickness of a round coin. Cut out rounds using a cookie cutter, large enough to fit a fairy cake pan, line the bases of the tin.
- Fill each pastry case with a spoonful of jam, be carful not to overfill the cases. Cut out 12 further circles of pastry and top the pies, brush the edge of the bottom pastry circle with a little egg wash then squish the edges together.
- Brush each pie with the beaten egg and sprinkle with sugar.
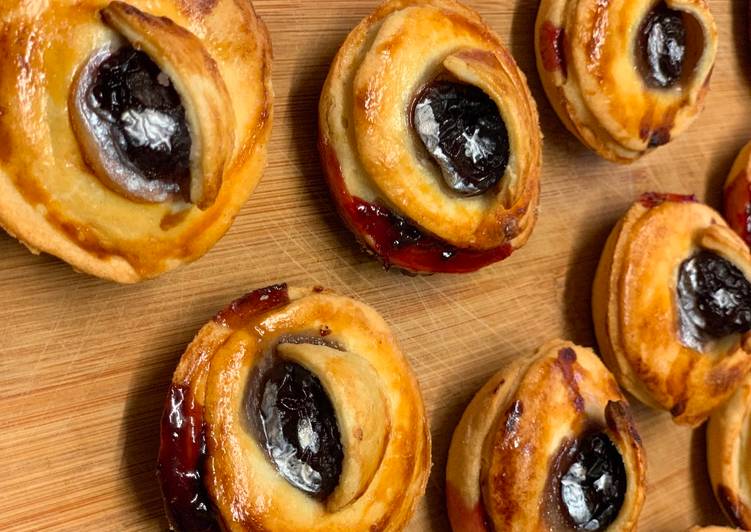
- Add a frozen cherry to the top of each of the pies. Then using the pastry off cuts cut 12 smaller circles, then cut a straight side of each of the circles, place this over the cherry to form an "eyelid". Brush the "eyelid" with for egg wash.
- Bake for 12-15 mins until golden brown. Transfer top a cooling rack and allow to cool.
- Once cool add a white pupil with edible paint.
Egg - the egg is beaten and brushed on the 'mummy wrappings' on top of the hand pie for a slightly shiny look after they are baked. Jack Skellington Balsamic Cherry Pie This Jack Skellington Pie is a fun and spooky way to serve up a Halloween desert. This sweet and syrupy cherry balsamic pie will tantalize your taste buds! With a chocolate pastry crust cut out in Jack-O-Lantern shapes and canned cherry pie filling, this handheld dessert will be a hit at Halloween parties! I love cooking but sometimes it is great to have a few recipes which are quick and easy to put together, but are super delicious and spooky for Halloween.
So that’s going to wrap it up with this exceptional food halloween cherry 'eye' pies recipe. Thanks so much for reading. I’m confident that you will make this at home. There’s gonna be interesting food in home recipes coming up. Remember to bookmark this page on your browser, and share it to your loved ones, colleague and friends. Thank you for reading. Go on get cooking!